 Shop Online


Wallpaper is certainly in the spotlight with dramatic patterns, tasteful hues, and easy application. However, what happens when you have old wallpaper in your home that you want to remove, whether you want to paint or apply new wallpaper?
Although removing old wallpaper can seem like a headache you’d rather avoid, we have some tips and tools here for you to safely and effectively remove wallpaper without damaging your walls or your sanity. Some painting and wallpaper contractors will provide this service, but you can do this yourself!
There are several types of wallpapers out there. Here is a list of the most common:
- Wallpaper with or without a vinyl coating
- Solid Vinyl with a synthetic or fabric backing
- Solid Vinyl with a paper backing
- Wallpaper with a strippable backing
Find Out If Your Wallpaper Is Removeable
Before you get started with removing wallpaper, find out if your wallpaper is peelable or strippable. These are generally wallpapers manufactured in the last 10 years that easily peel off, leaving a paper backing on the wall or strip off completely without water or chemicals. If your wallpaper is older, it’s best to assume you’ll need extra tools and supplies. Bring a piece of your wallpaper by Color Wheel so we can help determine what’s needed.
Determining if your walls were prepared before the wallpaper was hung is critical. Wallpaper primer prevents the adhesive from soaking into the drywall or plaster behind it, which allows for easy removal. Unfortunately, this step is often skipped.
Plan Accordingly with Time and Tools
Proper planning will make your wallpaper removal job that much easier. If your wallpaper was not applied with primer or is not peelable, chances are it will take you the better part of a day to remove wallpaper in just one room.
Removing non-peelable wallpaper can be messy and takes time. Remember, the longer the wallpaper has been there, the harder it may be to remove. Therefore, it’s essential to plan and prep your space before getting started.
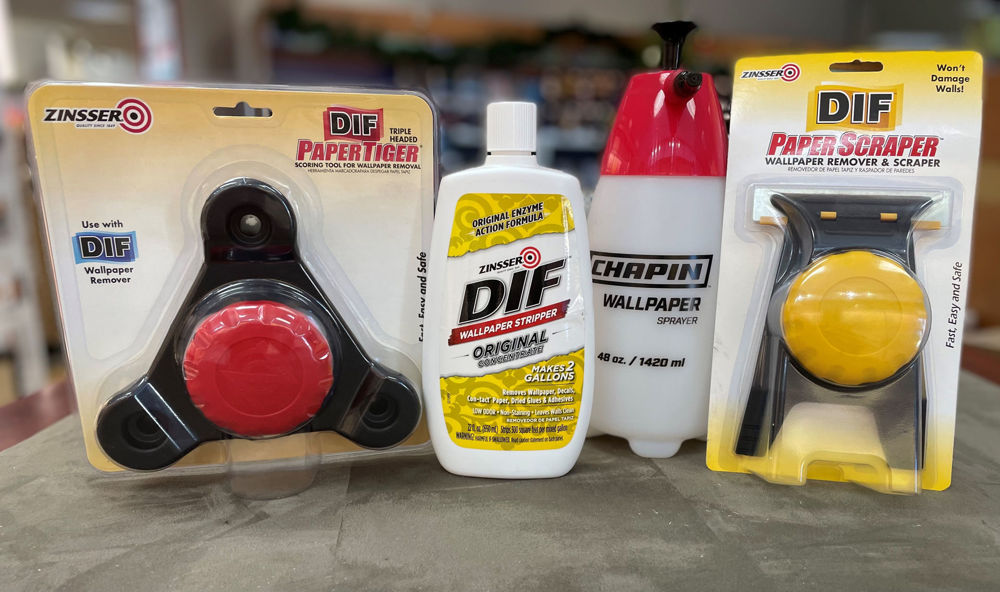
Tools and supplies you may need:
- Wallpaper Stripper Concentrate and a bucket
- Scoring Tool to break the surface and allow remover to dissolve the adhesive
- Wallpaper Shaver and extra blades
- Drop cloths
- Painter’s tape
- Towels
The drop cloths, towels, and painter’s tape will help you protect floors, trim, outlets, and vents, although it’s still wise to turn off the electricity in that room and move furniture before getting started.
Let’s get started
Use the Scoring tool, punch small and shallow holes in the surface of the wallpaper. You can do the entire room ahead of time or work in smaller sections. It’s kind of fun but your arm may get tired. Older children may enjoy doing this so put them to work.
Mix the wallpaper stripper concentrate according to the instructions on the container. Mix smaller batches if you’re not planning to remove the entire room at one time. There’s no rush.
Apply the solution, working in a small area, to the surface of the wallpaper and wait the recommended amount of time in the instructions. If you hurry, the stripper will not have time to do its job. Working in a small area first, will allow you to see how it’s working and when to start shaving. Try a 3’ x 3’ square.
The wallpaper may be able to be removed in full sheets depending on the prior wall prep and the type of paper. Pull gently in a diagonal direction, SLOWLY! Never pull fast as you may tear off the surface of the drywall underneath. If this works, skip the next step and do a little happy dance.
If you’re not dancing, we recommend using a wallpaper shaver which protect the wall surface from gouges and to more easily scrape the wallpaper off. Putty knives are too thick and narrow to do this efficiently. It’s important to change the blades regularly. As you’re working, if it seems like an area is harder to remove, you probably need to change the blade.
Using a sprayer for the stripper can also help you properly saturate the wallpaper—often, a rag or spray bottle won’t do the job. Remember to do one section at a time, as the sections should not dry out before you can attempt to remove them.
Don’t Forget to Clean Your Walls
Your job isn’t done once the wallpaper is removed. You’ll still need to clean your walls, as paste or glue may be left over on the drywall or plaster. A sponge and stripper help remove any most of adhesive on drywall or plaster. You may need to patch a few areas before sanding and priming for new paint or wallpaper. Apply a coat of a quality primer before painting, we recommend Benjamin Moore’s Fresh Start in most cases.
Contact Us for Wallpaper Help
Color Wheel can help you pick the perfect new paint or wallpaper for your space, as well as assist you with choosing the right tools for your next wallpaper removal job. Contact Color Wheel today or stop by and see us and we will be happy to assist you!